Mounting a Finding Aids Collection
From DLXS Documentation
Main Page > Mounting Collections: Class-specific Steps > Mounting a Finding Aids Collection
This topic describes how to mount a Findaid Class collection.
[edit] Overview
The Finding Aids Class is in many ways similar in behavior to Text Class. Access minimally includes full text searching across collections or within a particular collection of Finding Aids, viewing Finding Aids in a variety of display formats, and creation of personal collections ("bookbag") of Finding Aids.
To mount a Finding Aids Collection, you will need to complete the following steps:
- Prepare your data and set up a directory structure
- Validate and normalize your data
- Build the Index
- Mount the collection online
[edit] Findaid Class Behaviors Overview
This section describes the basic Findaid Class behaviors.
[edit] Examples of Findaid Class Implementations and Practices
This section contains links to public implementations of DLXS Findaid Class as well as documentation on workflow and implementation issues. If you are a member of DLXS and have a collection or resource you would like to add, or wish to add more information about your collection, please edit this section.
- University of Michigan, Bentley Historical Library Finding Aids
- Search page for Bentley out-of-the-box DLXS 13 implementation.
- University of Michigan, Bentley Historical Library Finding Aids Main Entry Page
- Main entry page for Bentley Out-of-the-box DLXS 13 implementation.
- Overview of Bentley's workflow process for Finding Aids
- See also the links in Practical EAD Encoding Issues for background on the Bentley EAD workflow and encoding practices
- Unversity of Tennesee Special Collections Libraries
- DLXS Findaid Class version ?
- University of Pittsburgh, Historic Pittsburgh Finding Aids
- DLXS Findaid Class version ?
- Background on Pittsburgh Finding Aids workflow
- University of Wisconsin, Archival Resources in Wisconsin: Descriptive Finding Aids
- DLXS Findaid Class version ?
- University of Minnesota Libraries, Online Finding Aids
- DLXS Findaid Class version ?
[edit] Working with the EAD
[edit] EAD 2002 DTD Overview
These instructions assume that you have already encoded your finding aids files in the XML-based EAD 2002 DTD. If you have finding aids encoded using the older EAD 1.0 standard or are using the SGML version of EAD2002, you will need to convert your files to the XML version of EAD2002. When converting from SGML to XML a number of character set issues may arise. See Data Conversion and Preparation: Unicode,XML, and Normalization.
Resources for converting from EAD 1.0 to EAD2002 and/or from SGML EAD to XML EAD are available from:
- The Society of American Archivists EAD Tools page: http://www.archivists.org/saagroups/ead/tools.html
- Library of Congress EAD conversion tools: http://lcweb2.loc.gov/music/eadmusic/eadconv12/ead2002_r.htm
If you use a conversion program such as the one supplied by the Library of Congress, make sure you read the documentation, and change the settings according to your local practices before converting a large number of EADS. For example if you use the LC converter, you probably will want to change the xsl that inserts the string "hdl:loc" in the eadid so that the output follows your local practices.
Other good sources of information about EAD encoding practices and practical issues involved with EADs are:
- Library of Congress EAD page http://www.loc.gov/ead/ (This is the home of the EAD standard
- EAD2002 tag library http://www.loc.gov/ead/tglib/index.html
- The Society of American Archivists EAD Help page: http://www.archivists.org/saagroups/ead/
- Various EAD Best Practice Guidelines listed on the Society of American Archivists EAD essentials page: http://www.archivists.org/saagroups/ead/essentials.html (the links to BPGs are at the bottom of the page)
- The EAD listserv http://listserv.loc.gov/listarch/ead.html
Sources of information about more general issues such as user studies can be found in:
http://www.library.uiuc.edu/archives/features/workpap.php
[edit] Practical EAD Encoding Issues
The EAD standard was designed as a loose standard in order to accommodate the large variety in local practices for paper finding aids and make it easy for archives to convert from paper to electronic form. As a result, conformance with the EAD standard still allows a great deal of variety in encoding practices.
The DLXS software is primarily designed as a system for mounting University of Michigan collections. In the case of finding aids, the software has been designed to accommodate the encoding practices of the Bentley Historical Library. The more similar your data and setup is to the Bentley’s, the easier is will be to integrate your finding aids collection with DLXS. If your practices differ significantly from the Bentley’s, you will probably need to do some preprocessing of your files and/or make changes to DLXS.
More information on the Bentley's encoding practices and workflow:
- Overview of Bentley's workflow process for Finding Aids http://bentley.umich.edu/EAD/eadproject.php
- Description of Bentley Finding Aids and their presentation on the web http://bentley.umich.edu/EAD/system.php
- Bentley MS Word EAD templates and macros http://bentley.umich.edu/EAD/bhlfiles.php
- Description of EAD tags used in Bentley EADs http://bentley.umich.edu/EAD/bhltags.php
[edit] Types of changes to accomodate differing encoding practices and/or interface changes
- Custom preprocessing
- Add dummy EAD to data
- Modify prep scripts (Makefile, preparedocs.pl, validateeach.csh)
- Modify *inp files (DOCTYPE declarations and entities)
- Modify fabricated regions (*.extra.srch)
- Modify CollMgr entries
- Modify findaidclass.cfg (change table of contents sections)
- Subclass FindaidClass.pm
- Modify XSL
- Modify XML templates
- Modify CSS
[edit] Specific Encoding Issues
There are a number of encoding issues that may affect the data preparation, indexing, searching, and rendering of your finding aids. Some of them are:
- Preprocessing and Data Prep issues
- <eadid> should be less than about 20 characters in length
- Attribute ids must be unique within the entire collection
- If you use attribute ids and corresponding targets within your EADs preparedocs.pl may need to be modified.
- Character Encoding issues
- UTF-8 Byte Order Marks (BOM) should be removed from EADs prior to concatenation
- XML processing instructions should be removed from EADs prior to concatenation
- Multiline DOCTYPE declarations are not properly handled the data prep scripts in release 13 and earlier (without August 24, 2007 patch).
- If your DOCTYPE declaration contains entities, you need to modify the appropriate *dcl files accordingly. See $DLXSROOT/prep/s/samplefa/samplefa.ead2002.entity.example.dcl for an example )
- Out-of-the-box <dao> handling may need to be modified for your needs
- Fabricated region issues (some of these involve XSL as well)
- If your <unititle> element precedes your <origination> element in the top level <did>, you will have to modify the maintitle fabricated region query in *.extra.srch See Troubleshooting:Title of Finding Aid does not show up
- If you do not use a <frontmatter> element, you will either have to either a) create and populate frontmatter elements in your EADs manually, or b) run your EADs through some preprocessing XSL to create and populate frontmatter elements, or c) you will have to create a fabricated region to provide an appropriate "Title Page" region based on the <eadheader> and you may also need to change the XSL and/or subclass FindaidClass to change the code that handles the Title Page region.
- Table of Contents and Focus Region issues
- If you do not use a <frontmatter> element you may have to make the changes mentioned above to get the title page to show in the table of contents and when the user clicks on the "Title Page" link in the table of contents
- If your encoding practices for <biohist> differ from the Bentley's, you may need to make changes in findaidclass.cfg or create a subclass of FindaidClass and override FindaidClass:: GetBioghistTocHead, and/or change the appropriate XSL files.
- If you want <relatedmaterial> and/or <separatedmaterial> to show up in the table of contents (TOC) on the left hand side of the Finding Aids, you may have to modify findaidclass.cfg and make other modifications to the code. This also applies if there are other sections of the finding aid not listed in the out-of-the-box findaidclass.cfg %gSectHeadsHash.
- See also Customizing Findaid Class: Working with the table of contents
- XSL issues
- If you have encoded <unitdate>s as siblings of <unittitle>s, you may have to modify the appropriate XSL templates.
- If you want the middleware to use the <head> element for labeling sections instead of the default hard-coded values in findaidclass.cfg, you may need to change fabricated regions and/or make changes to the XSL and/or possibly modify findaidclass.cfg or subclass FindaidClass.
[edit] Preparing Data and Directories
[edit] Set Up Directories and Files for Data Preparation
You will need to set up a directory structure where you plan to store your EAD2002 XML source files, your object files (used by xpat for indexing), index files (including region index files)and other information such as data dictionaries, and files you use to prepare your data.
The convention used by DLXS is to use subdirectories named with the first letter of the collection id and the collection name:$DLXSROOT/xxx/{c}/{coll}/ where $DLXSROOT is the "tree" where you install all DLXS components, {c} is the first letter of the name of the collection you are indexing, and {coll} is the collection ID of the collection you are indexing. For example, if your collection ID is "bhlead" and your DLXSROOT is "/l1", you will place the Makefile in /l1/bin/b/bhlead/ , e.g., /l1/bin/b/bhlead/Makefile. See the DLPS Directory Conventions section and Workshop discussion of Directory Conventionsfor more information.
When deciding on your collection id consider that it needs to be unique across all classes to enable cross-collection searching. So you don't want both a text class collection with a collid of "my_coll" and a finding aid class collection with a collection id of "my_coll". You will also probably want to make your collection ids rather short and make sure they don't contain any special characters, since they will also be used for sub-directory names.
The Makefile we provide along with most of the data preparation scripts supplied with DLXS assume the directory structure described below. We recommend you follow these conventions.
- Specialized scripts for collection-specific data preparation or preprocessing are stored in $DLXSROOT/bin/{c}/{coll}/ where $DLXSROOT is the "tree" where you install all DLXS components, {c} is the first letter of the name of the collection you are indexing, and {coll} is the collection ID of the collection you are indexing. For example, if your collection ID is "bhlead" and your DLXSROOT is "/l1", you will place the Makefile in /l1/bin/b/bhlead/ , e.g., /l1/bin/b/bhlead/Makefile. The Makefile and preparedocs.pl which can be customized for a specific collection are stored in this directory. See the DLPS Directory Conventions section for more information.
- General processing utilities that can be applied to any collection for Findaid Class data prep are stored in $DLXSROOT/bin/f/findaid.
- Raw Finding aids should be stored in $DLXSROOT/prep/{c}/{coll}/data/.
- Doctype declarations, data dictionary and fabricated region templates, and other files for preparing your data should be in $DLXSROOT/prep/{c}/{coll}/. Unlike the contents of other directories, everything in prep should be expendable after indexing. The Makefile stores temporary/intermediate files here as well.
- After running all the targets in the Makefile, the finalized, concatenated XML file for your finding aids collection will be created in $DLXSROOT/obj/{c}/{coll}/ , e.g., /l1/obj/b/bhlead/bhlead.xml.
- After running all the targets in the Makefile, the index, region and data dictionary files will be stored in $DLXSROOT/idx/{c}/{coll}/ , e.g., /l1/idx/b/bhlead/bhlead.idx. These will be updated as the index related targets in the Makefile are run. See the XPAT documentation for more on these types of files.
[edit] Fixing paths
The installation script should have changed all instances of /l1/ to your $DLXSROOT and all bang prompts "#!/l/local/bin/perl" to your location of perl. However, you may wish to check the following scripts:
- $DLXSROOT/bin/f/findaid/output.dd.frag.pl
- $DLXSROOT/bin/f/findaid/inc.extra.dd.pl
- $DLXSROOT/bin/f/findaid/fixdoctype.pl
- $DLXSROOT/bin/s/samplefa/preparedocs.pl
You also might want to check that the path to the shell executable is correct in
- $DLXSROOT/bin/f/findaid/validateeach.sh
If you use the Makefile in $DLXSROOT/bin/s/samplefa you should check that the paths in the Makefile are correct for the locations of xpat, oxs, and osgmlnorm as installed on your system. These are the Make varibles that should be checked:
- XPATBINDIR
- OSX
- OSGMLNORM
[edit] Step by step instructions for setting up Directories for Data Preparation
You can use the scripts and files from the sample finding aids collection "samplefa" as a basis for creating a new collection.
- What is "/w/workshopfa"?
- How do I use the examples for my own collections?
The instructions and examples in this section are designed for use at the DLXS workshop http://www.dlxs.org/training/workshops.html
If you are not at the workshop, and want to use these instructions on your own collections, in the instructions that follow you would use /{c}/{coll} instead of /w/workshopfa where {c} is the first letter of your collection id and {coll} is your collection id. So for example if your collection id was mycoll instead of
cp $DLXSROOT/prep/s/samplefa/samplefa.extra.srch $DLXSROOT/prep/w/workshopfa/workshopfa.extra.srch
you would do
cp $DLXSROOT/prep/s/samplefa/samplefa.extra.srch $DLXSROOT/prep/m/mycoll/mycoll.extra.srch
This documentation will make use of the concept of the $DLXSROOT, which is the place at which your DLXS directory structure starts. We generally use /l1/.
To check your $DLXSROOT, type the following command at the command prompt:
echo $DLXSROOT
With Release 14, you can use the $DLXSROOT/bin/f/findaid/setup_newcoll command to automatically do all the steps in setting up files and directories as described in Set Up Directories and Files for Data Preparation and Set Up Directories and Files for XPAT Indexing. To set up the workshopfa collection based on samplefa (after making sure your $DLXSROOT environment variable is set as described above) run this command:
$DLXSROOT/bin/f/findaid/setup_newcoll -c workshopfa -s $DLXSROOT/prep/s/samplefa/data
More information on the setup_newcoll script can be found by clicking here or invoking the man page:
$DLXSROOT/bin/f/findaid/setup_newcoll --man
You can use setup_newcoll instead of all the steps that follow in this section
The prep directory under $DLXSROOT is the space for you to take your encoded finding aids and "package them up" for use with the DLXS middleware. Create your basic directory $DLXSROOT/prep/w/workshopfa and its data subdirectory with the following command:
mkdir -p $DLXSROOT/prep/w/workshopfa/data
Move into the prep directory with the following command:
cd $DLXSROOT/prep/w/workshopfa
This will be your staging area for all the things you will be doing to your EADs, and ultimately to your collection. At present, all it contains is the data subdirectory you created a moment ago. Unlike the contents of other collection-specific directories, everything in prep should be ultimately expendable in the production environment.
Copy the necessary files into your data directory with the following commands:
cp $DLXSROOT/prep/s/samplefa/data/*.xml $DLXSROOT/prep/w/workshopfa/data/.
We'll also need a few files to get us started working. They will need to be copied over as well, and also have paths adapted and collection identifiers changed. Follow these commands:
cp $DLXSROOT/prep/s/samplefa/samplefa.ead2002.dcl $DLXSROOT/prep/w/workshopfa/workshopfa.ead2002.dcl
cp $DLXSROOT/prep/s/samplefa/samplefa.concat.ead.dcl $DLXSROOT/prep/w/workshopfa/workshopfa.concat.ead.dcl
mkdir -p $DLXSROOT/obj/w/workshopfa
mkdir -p $DLXSROOT/bin/w/workshopfa
cp $DLXSROOT/bin/s/samplefa/preparedocs.pl $DLXSROOT/bin/w/workshopfa/preparedocs.pl
cp $DLXSROOT/bin/s/samplefa/Makefile $DLXSROOT/bin/w/workshopfa/Makefile
Make sure you check and edit if necessary the perl bang prompt and the paths to your shell and directories in these files:
   * $DLXSROOT/bin/f/findaid/stripdoctype.pl
   * $DLXSROOT/bin/f/findaid/fixdoctype.pl
   * $DLXSROOT/bin/f/findaid/validateeach.sh
   * $DLXSROOT/bin/w/workshopfa/preparedocs.pl
* $DLXSROOT/bin/w/workshopfa/Makefile
With the ready-to-go ead2002 encoded finding aids files in the data directory, we are ready to begin the preparation process. This will include:
- Validating the files individually against the EAD 2002 DTD
- Concatenating the files into one larger XML file
- Validating the concatenated file against the dlxsead2002 DTD
- "Normalizing" the concatenated file.
- Validating the normalized concatenated file against the dlxsead2002 DTD
These steps are generally handled via the Makefile in $DLXSROOT/bin/s/samplefa which we have copied to $DLXSROOT/bin/w/workshopfa. Example Makefile.
Make sure you changed your copy of the Makefile to reflect /w/workshopfa instead of /s/samplefa and that your $DLXSROOT is set correctly in the Makefile. You will want to change lines 1-3 accordingly
   1  DLXSROOT = /l1
   2  NAMEPREFIX = samplefa
   3  FIRSTLETTERSUBDIR = s
If you look closely at the first line of what the Makefile reported to standard output (see below) you will see that the Makefile will get confused about file paths and instead of running the command:
$DLXSROOT/bin/f/findaid/validateeach.sh
-d $DLXSROOT/prep/w/workshopfa/data/
-x $DLXSROOT/misc/sgml/xml.dcl
-t $DLXSROOT/prep/w/workshopfa/workshopfa.ead2002.dcl
It will complain that the file paths don't make sense:
$DLXSROOT/bin/f/findaid/validateeach.sh
-d $DLXSROOT/prep/w /workshopfa/data/
-x $DLXSROOT/misc/sgml/xml.dcl
-t $DLXSROOT/prep/w /workshopfa/workshopfa .ead2002.dcl
working on $DLXSROOT/prep/w*.xml
Can't open $DLXSROOT/prep/w*.xml: No such file or directory at $DLXSROOT/bin/f/findaid/fixdoctype.pl line 25.
It looks for xml files in $DLXSROOT/prep/w instead of $DLXSROOT/prep/w/workshopfa/data and exits.
Further note on editing the Makefile: If you modify or write your own Make targets, you need to make sure that a real "tab" starts each command line rather than spaces. The easiest way to check for these kinds of errors is to use "cat -vet Makefile" to show all spaces, tabs and newlines
The installation program should have changed the locations of the various binaries in the Makefile to match your answers in the installation process. However, its a good idea to check to make sure that the locations of the various binaries to have been changed to match your installation.
- Change XPATBINDIR = /l/local/bin/ to the location of the xpat binary in your installation
- Change the location of the osx binary from
OSX = /l/local/bin/osx
to the location in your installation
- Change the location of the osgmlnorm binary from
OSGMLNORM = /l/local/bin/osgmlnorm
to the location in your installation
[edit] Set Up Directories and Files for XPAT Indexing
If you are not following these instructions at the DLXS workshop, please substitute /{c}/{coll} where {c} is the first letter of your collection id
and {coll}is your collection id  for any instance of /w/workshopfa
and substitute {coll} wherever you see "workshopfa" in the following instructions.
First, we need to create the rest of the directories in the workshopfa environment with the following commands:
mkdir -p $DLXSROOT/idx/w/workshopfa
The bin directory we created when we prepared directories for data preparation holds any scripts or tools used for the collection specifically; obj ( created earlier) holds the "object" or XML file for the collection, and idx holds the XPAT indexes. Now we need to finish populating the directories.
 cp $DLXSROOT/prep/s/samplefa/samplefa.blank.dd  $DLXSROOT/prep/w/workshopfa/workshopfa.blank.dd
 cp $DLXSROOT/prep/s/samplefa/samplefa.extra.srch $DLXSROOT/prep/w/workshopfa/workshopfa.extra.srch
Both of these files need to be edited to reflect the new collection name and the paths to your particular directories. Failure to change even one line in one file can result in puzzling errors, because the scripts are working, just not necessarily in the directories you are looking at.
cd $DLXSROOT/prep/w/workshopfa
After editing the files, you can check to make sure you changed all the "samplefa" strings with the following command:
grep -l "samplefa" $DLXSROOT/prep/w/workshopfa/*
You also need to check that "/l1/" has been replacedby whatever $DLXSROOT is on your server. If you don't have an /l1 directory on your server (which is very likely if you are not here using a DLPS machine) you can check with:
grep -l "l1" $DLXSROOT/prep/w/workshopfa/*
[edit] Finding Aids Data Preparation
Main Page > Mounting Collections: Class-specific Steps > Mounting a Finding Aids Collection > Finding Aids Data Preparation
[edit] Overview of Data Preparation and Indexing Steps
Data Preparation
- Validate the files individually against the EAD 2002 DTD
make validateeach
- Concatenate the files into one larger XML file
make prepdocs
- Validate the concatenated file against the dlxsead2002 DTD:
make validate
- Normalize the concatenated file.
make norm
- Validate the normalized concatenated file against the dlxsead2002 DTD
make validate
The end result of these steps is a file containing the concatenated EADs wrapped in a <COLL> element which validates against the dlxsead2002 and is ready for indexing:
<COLL>
<ead><eadheader><eadid>1</eadid>...</eadheader>... content</ead>
<ead><eadheader><eadid>2</eadid>...</eadheader>... content</ead>
<ead><eadheader><eadid>3</eadid>...</eadheader>... content</ead>
</COLL>
WARNING! If there are extra characters or some other problem with the part of the program that strips out the xml declaration and the doctype declaration the file will end up like:
<COLL>
baddata<ead><eadheader><eadid>1</eadid>...</eadheader>... content</ead>
baddata<ead><eadheader><eadid>2</eadid>...</eadheader>... content</ead>
baddata<ead><eadheader><eadid>3</eadid>...</eadheader>... content</ead>
</COLL>
In this case you will get "character data not allowed" or similar errors during the make validate step. You can troubleshoot by looking at the concatenated file and/or checking your original EADs.
Indexing
- make singledd indexes all the words in the concatenated file.
- make xml indexes the XML structure by reading the DTD. Validates as it indexes.
- make post builds and indexes fabricated regions based on the XPAT queries stored in the workshopfa.extra.srch file.
[edit] Preprocessing
[edit] Validating and Normalizing Your Data
[edit] Step 1: Validating the files individually against the EAD 2002 DTD
cd $DLXSROOT/bin/w/workshopfa
make validateeach
The Makefile runs the following command:
% $DLXSROOT/bin/f/finadaid/validateeach.sh
What's happening: The makefile is running the bourne-shell script validateeach.sh in the $DLXSROOT/bin/f/findaid directory. The script processes each *.xml file in the data directory. For each file, it creates a temporary file without the public DOCTYPE declaration, and then runs onsgmls on each of the resulting XML files in the data subdirectory to make sure they conform with the EAD 2002 DTD. If validation errors occur, error files will be in the data subdirectory with the same name as the finding aids file but with an extension of .err. If there are validation errors, fix the problems in the source XML files and re-run.
Check the error files by running the following commands
ls -l $DLXSROOT/prep/w/workshopfa/data/*err
if there are any *err files, you can look at them with the following command:
less $DLXSROOT/prep/w/workshopfa/data/*err
[edit] Common error messages and solutions:
- onsgmls: Command not found
- The location of the onsgmls binary is not in your $PATH.
- entityref errors such as "general entity 'foobar' not defined"
- If you use entityrefs in your EADs, you may see errors relating to problems resolving entities. Example entityref errors. The solution is to add the entityref declarations to the doctype declaration in these two files:
- $DLXSROOT/prep/s/samplefa/samplefa.ead2002.dcl
- This is the doctype declaration used by the validateeach.sh script that points to the EAD2002 DTD.
- $DLXSROOT/prep/s/samplefa/samplefa.concat.ead.dcl
- This is the doctype declaration that points to the dlxs2002 dtd. The dlxs2002 dtd essentially the dlxs2002 dtd with modifications to provide for multiple eads within one file. It is used by the "make validate" target of the Makefile to validate the concatenated file containing all of your EADs.
- See $DLXSROOT/prep/s/samplefa/samplefa.ead2002.entity.example.dcl for an example of adding entityrefs to your docytype declaration files.
[edit] Step 2: Concatentating the files into one larger XML file (and running some preprocessing commands)
cd $DLXSROOT/bin/w/workshopfa
make prepdocs
The Makefile runs the following command:
$DLXSROOT/bin/w/workshopfa/preparedocs.pl
  -d $DLXSROOT/prep/w/workshopfa/data
  -o $DLXSROOT/obj/w/workshopfa/workshopfa.xml
  -l $DLXSROOT/prep/w/workshopfa/logfile.txt
This runs the preparedocs.pl script on all the files in the specified data directory and writes the output to the workshopfa.xml file in the appropriate /obj subdirectory. It also outputs a logfile to the /prep directory:
The Perl script does two sets of things:
- Concatenates all the files
- Runs a number of preprocessing steps on all the files
Concatenating the files
The script finds all XML files in the data subdirectory,and then strips off the XML declaration and doctype declaration from each file before concatenating them together. It also wraps the concatenated EADs in a <COLL> tag . The end result looks like:
<COLL>
<ead><eadheader><eadid>1</eadid>...</eadheader>... content</ead>
<ead><eadheader><eadid>2</eadid>...</eadheader>... content</ead>
<ead><eadheader><eadid>3</eadid>...</eadheader>... content</ead>
</COLL>
WARNING! If are extra characters or some other problem with the part of the program that strips out the xml declaration and the docytype declearation the file will end up like:
<COLL>
baddata<ead><eadheader><eadid>1</eadid>...</eadheader>... content</ead>
baddata<ead><eadheader><eadid>2</eadid>...</eadheader>... content</ead>
baddata<ead><eadheader><eadid>3</eadid>...</eadheader>... content</ead>
</COLL>
This will cause the document to be invalid since the dlxsead2002.dtd does not allow anything between the closing tag of one </ead> and the opening tag of the next one <ead>
Some of the possible causes of such a problem are:
- UTF-8 Byte Order Marks at the beginning of the file
- DOCTYPE declaration on more than one line
- XML processing instructions
Preprocessing steps
The perl program also does some preprocessing on all the files. Some of these steps are customized to the needs of the Bentley.
The preprocessing steps are:
- finds all id attributes and prepends a number to them
- removes XML declaration
- removes DOCTYPE declaration
- removes XML processing instructions
- removes the utf8 Byte Order Mark
Bentley specific processing:
- adds a prefix string "dao-bhl" to all DAO links
- removes empty persname, corpname, and famname elements
The output of the combined concatenation and preprocessing steps will be the one collection named xml file which is deposited into the obj subdirectory.
If your collections need to be transformed in any way, or if you do not want the transformations to take place (the DAO changes, for example), you can edit preparedocs.pl file to effect the changes. Some changes you may want to make include:
- Changing the algorithm used to make id attibute unique. For example if your encoding practices use id attributes and targets, the out-of-the-box algorithm will remove the relationship between the attributes and targets. One possible modification might be to modify the algorithm to prepend the eadid or filename to all id and target attributes. (See the commented out code in preparedocs.pl for an example of how to do this)
Changing the default sort order or indexing only certain files in the data directory
The default order for search results in Findaid Class is the order they were concatenated. If you want to change the default order or if you have a reason to only index some of the files in your data directory,you can make a list of the files you wish to concatenate and put the list in a file in $DLXSROOT/prep/w/workshopfa called list_of_eads. You can then run the
"make prepdocslist"
command which will run the preparedocs.pl with the -i inputfilelist flag instead of the -d dir flag. This tells the program to read a list of files instead of processing all the xml files in the specified directory. To create your list of files you can write a script which looks at the eads for some element that you want to sort by and then outputs a list of filenames sorted by that order, you can then either name the file list_of_eads. or pass that filname to preparedocs.pl -i command so it would concatenate the files in the order listed.
For more information on options to the preparedocs.pl script, run the command:
$DLXSROOT/bin/s/samplefa/preparedocs.pl --man
[edit] Step 3: Validating the concatenated file against the dlxsead2002 DTD
make validate
The Makefile runs the following command:
onsgmls -wxml -s -f $DLXSROOT/prep/w/workshopfa/workshopfa.errors
$DLXSROOT/misc/sgml/xml.dcl
$DLXSROOT/prep/w/workshopfa/workshopfa.concat.ead.dcl
$DLXSROOT/obj/w/workshopfa/workshopfa.xml
This runs the onsgmls command against the concatenated file using the dlxs2002dtd, and writes any errors to the workshopfa.errors file in the appropriate subdirectory in $DLXSROOT/prep/c/collection.. More details Note that we are running this using workshopfa.concat.ead.dcl not workshopfa.ead2002.dcl. The workshopfa.concat.ead.dcl file points to $DLXSROOT/misc/sgml/dlxsead2002.ead which is the dlxsead2002 DTD. The dlxsead2002 DTD is exactly the same as the EAD2002 DTD, but adds a wrapping element, <COLL>, to be able to combine more than one ead element, more than one finding aid, into one file. It is, of course, a good idea to validate the file now before going further.
Run the following command
ls -l $DLXSROOT/prep/w/workshopfa/workshopfa.errors
If there is a workshopfa.errors file then run the following command to look at the errors reported
less $DLXSROOT/prep/w/workshopfa/workshopfa.errors
[edit] Common common causes of error messages and solutions
- make: onsgmls: Command not found
- OSGMLNORM variable in Makefile does not point to correct location of onsgmls for your installation or openSP is not installed.
- If there were no errors when you ran "make validateeach" but you are now seeing errors
- there was very likely a problem with the preparedocs.pl processing.
- The DOCTYPE declaration did not get completely removed. (Scripts prior to Release 13 August 24 patch, don't always remove multiline DOCTYPE declarations)
- There was a UTF-8 Byte Order Mark at the begginning of one or more of the concatenated files
- onsgmls
- /l1/dev/tburtonw/misc/sgml/xml.dcl:1:W: SGML declaration was not implied
- The above error can be ignored.
[edit] Step 4: Normalizing the concatenated file
make norm
The Makefile runs a series of copy statements and two main commands:
1.)   /l/local/bin/osgmlnorm -f $DLXSROOT/prep/w/workshopfa/workshopfa.osgmlnorm.errors
      $DLXSROOT/misc/sgml/xml.dcl
      $DLXSROOT/prep/w/workshopfa/workshopfa.concat.ead.dcl
      $DLXSROOT/obj/w/workshopfa/workshopfa.xml.prenorm > $DLXSROOT/obj/w/workshopfa/workshopfa.xml.postnorm
2.)  /l/local/bin/osx -E0 -bUTF-8 -xlower -xempty -xno-nl-in-tag
     -f $DLXSROOT/prep/w/workshopfa/workshopfa.osx.errors
     $DLXSROOT/misc/sgml/xml.dcl
     $DLXSROOT/prep/w/workshopfa/workshopfa.concat.ead.dcl
     $DLXSROOT/obj/w/workshopfa/workshopfa.xml.postnorm > $DLXSROOT/obj/w/workshopfa/workshopfa.xml.postnorm.osx
These commands ensure that your collection data is normalized. What this means is that any attributes are put in the order in which they were defined in the DTD. Even though your collection data is XML and attribute order should be irrelevant (according to the XML specification), due to a bug in one of the supporting libraries used by xmlrgn (part of the indexing software), attributes must appear in the order that they are defined in the DTD. If you have "out-of-order" attributes and don't run make norm, you will get "invalid endpoints" errors during the make post step.
less $DLXSROOT/prep/w/workshopfa/workshopfa.osgmlnorm.errors
Step 2, which runs osx to convert the normalized document back into XML produces lots of error messages which are written to $DLXSROOT/prep/w/workshopfa/workshopfa.osx.errors. These will also result in the following message on standard output:
make: [norm] Error 1 (ignored)
These errors are caused because we are using an XML DTD (the EAD 2002 DTD) and osx is using it to validate against the SGML document created by the osgmlnorm step. These are the only errors which may generally be ignored. However, if the next recommended step, which is to run "make validate" again reveals an invalid document, you may want to rerun osx and look at the errors for clues. (Only do this if you are sure that the problem is not being caused by XML processing instructions in the documents as explained below)
[edit] Step 5: Validating the normalized file against the dlxsead2002 DTD
make validate2
Check the resulting error file:
less $DLXSROOT/prep/w/workshopfa/workshopfa.errors2
We run this step again to make sure that the normalization process did not produce an invalid document. This is necessary because under some circumstances the "make norm" step can result in invalid XML. One known cause of this is the presense of XML processing instructions. For example: "<?Pub Caret1?>". Although XML processing instructions are supposed to be ignored by any XML application that does not understand them, the problem is that when we use sgmlnorm and osx, which are SGML tools, they end up munging the output XML. The preparedocs.pl script used in the "make prepdocs" step should have removed any XML processing instructions.
[edit] Building the Index
Main Page > Mounting Collections: Class-specific Steps > Mounting a Finding Aids Collection > Building the Index
[edit] Indexing Overview
Indexing is relatively straightforward once you have followed the steps to set up data and directories and prepared and normalized your data as described in
- Step by step instructions for setting up Directories for Data Preparation,
- Set Up Directories and Files for XPAT Indexing,
- Validating and Normalizing Your Data,
To create an index for use with the Findaid Class interface, you will need to index the words in the collection, then index the XML (the structural metadata, if you will), and then finally "fabricate" regions based on a combination of elements (for example, defining what the "main entry" is, without adding a <MAINENTRY> tag around the appropriate <AUTHOR> or <TITLE> element).
The main work in the indexing step is making sure that the fabricated regions in the workshopfa.extra.srch file match the characteristics of your collection.
The Makefile in the $DLXSROOT/bin/w/workshopfa directory contains the commands necessary to build the index, and can be executed easily.
cd $DLXSROOT/bin/w/workshopfa
The following commands can be used to make the index:
make singledd indexes words in the EADs that have been concatenated into one large file for a collection.
make xml indexes the XML structure by reading the DTD. It validates as it indexes.
make post builds and indexes fabricated regions based on the XPAT queries stored in the workshopfa.extra.srch file. Because every collection is different, the *extra.srch file will probably need to be adapted for your collection. If you try to index/build fabricated regions from elements not used in your finding aids collection, you will see errors like:
<Error>No information for region famname in the data dictionary.</Error>
Error found: <Error>syntax error before: ")</Error>
when you use the make post command
[edit] Step by Step Instructions for Indexing
[edit] Step 1: Indexing the text
Index all the words in the file of concatenated EADs with the following command:
 cd $DLXSROOT/bin/w/workshopfa
 make singledd
The make file runs the following commands:
 cp $DLXSROOT/prep/w/workshopfa/workshopfa.blank.dd
 	$DLXSROOT/idx/w/workshopfa/workshopfa.dd
 /l/local/xpat/bin/xpatbld -m 256m -D $DLXSROOT/idx/w/workshopfa/workshopfa.dd
 cp $DLXSROOT/idx/w/workshopfa/workshopfa.dd
 	$DLXSROOT/prep/w/workshopfa/workshopfa.presgml.dd
[edit] Step 2: Indexing the the XML
Index all the elements and attributes listed in the ead DTD that occur in the file of concatenated EADs by running the following command:
make xml
The makefile runs the following commands:
 cp $DLXSROOT/prep/w/workshopfa/workshopfa.presgml.dd
 	$DLXSROOT/idx/w/workshopfa/workshopfa.dd
 /l/local/xpat/bin/xmlrgn -D $DLXSROOT/idx/w/workshopfa/workshopfa.dd
 	$DLXSROOT/misc/sgml/xml.dcl
 	$DLXSROOT/prep/w/workshopfa/workshopfa.concat.ead.dcl
 	$DLXSROOT/obj/w/workshopfa/workshopfa.xml

 cp $DLXSROOT/idx/w/workshopfa/workshopfa.dd
 	$DLXSROOT/idx/w/workshopfa/workshopfa.prepost.dd
After running this step, if you wish, you can see the indexed regions by issuing the following commands:
xpatu $DLXSROOT/w/workshopfa/workshopfa.dd
>> {ddinfo regionnames}
>> quit
You can also test out the xpat queries in your workshopfa.extra.srch file. See Testing Fabricated Regions
[edit] Step 3: Configuring fabricated regions
Fabricated regions are set up in the $DLXSROOT/prep/c/collection/collection.extra.srch file. The sample file $DLXSROOT/prep/s/samplefa/samplefa.extra.srch was designed for use with the Bentley's encoding practices. If your encoding practices differ from the Bentley's, or if your collection does not have all the elements that the samplefa.extra.srch xpat queries expect, you will need to edit your *.extra.srch file.
We recommend a combination of the following:
- Iterative work to insure make post does not report errors
- Up front analysis
- Iterative work to insure that searching and rendering work properly with your encoding practices.
Depending on your knowledge of your encoding practices you may prefer to do "up front analysis" first prior to running "make post". On the other hand, running "make post" will give you immediate feedback if there are any obvious errors.
[edit] Run the "make post" and iterate until there are no errors reported.
Run the "make post" step and look at the errors reported. Then modify *.extra.srch and rerun "make post". Repeat this until "make post" does not report any errors. See Step 4 Indexing fabricated regions below for information on running "make post."
The most common cause of "make post" errors related to fabricated regions result from a fabricated region being defined which includes an element which is not in your collection.
For example if you do not have any <famname> elements in any of the EADs in your collection and you are using the out-of-the-box samplefa.extra.srch, you will see an error message similare to the one below when xpat tries to index the mainauthor region using this rule below.
"No information for region "foo"
Error found:
<Error>No information for region famname in the data dictionary.</Error>
Error found:
(
     (region "persname" + region "corpname" + region "famname" + region "name")
      within
       (region "origination" within
          ( region "did" within
               (region "archdesc")
          )
       )
      );
{exportfile /l1/workshop/user11/dlxs/idx/s/samplefa/mainauthor.rgn"}; export;~sync "mainauthor";
So you could edit the rule to eliminate the "famname" element:
(
     (region "persname" + region "corpname" + region "name")
      within
       (region "origination" within
          ( region "did" within
               (region "archdesc")
          )
       )
      );
{exportfile /l1/workshop/user11/dlxs/idx/s/samplefa/mainauthor.rgn"}; export;~sync "mainauthor";
See Indexing Fabricated Regions: Common causes of error messages and solutions for other examples of "make post" error messages and solutions.
[edit] Analysis of your collection
You may be able to analyze your collection prior to running make post and determine what changes you want to make in the fabricated regions. If your analysis misses any changes, you can find this out by using the two previous techniques.
- Once you have run "make xml", but before you run "make post", start up xpatu running against the newly created indexes:
xpatu $DLXSROOT/idx/w/workshopfa/workshopfa.dd
then run the command
>> {ddinfo regionnames}
This will give you a list of all the XML elements, and attributes
Alternatively you can create a file called xpatregions and insert the following text:
{ddinfo regionnames}
Then run this command
$ xpatu /l1/dev/tburtonw/idx/w/workshopfa/workshopfa.dd < xpatregions > regions.out
Then you use the "regions.out" file you just created to sort and examine the list of fabricated regions which occur in your finding aids and compare them to the fabricated region queries in your copy of samplefa.extra.srch ( which you copied to workshopfa.extra.srch or collection_name.extra.srch)
[edit] Exercise the web user interface
Once make post does not report errors, you can follow the rest of the steps to put your collection on the web. Then carefully exercise the web user interface looking for the following symptoms:
- Searches that don't work properly because they depend on fabricated regions that don't match your encoding practices.
- Rendering that does not work properly. An example is that the name/title of the finding aid may not show up if your <unititle> element precedes your <origination> element in the top level <did>. See also Title of finding aid does not show up.
For more information on regions used for searching and rendering see
[edit] Step 4: Indexing fabricated regions
Index the fabricated regions specified in your workshopfa.extra.srch that occur in the file of concatenated EADs with the following command:
make post
The makefile runs the following commands:
 cp /l1/workshop/test02/dlxs/prep/w/workshopfa/workshopfa.prepost.dd
 	/l1/workshop/test02/dlxs/idx/w/workshopfa/workshopfa.dd
 touch /l1/workshop/test02/dlxs/idx/w/workshopfa/workshopfa.init
 /l/local/xpat/bin/xpat -q /l1/workshop/test02/dlxs/idx/w/workshopfa/workshopfa.dd
 	< /l1/workshop/test02/dlxs/prep/w/workshopfa/workshopfa.extra.srch
 	| /l1/workshop/test02/dlxs/bin/t/text/output.dd.frag.pl
 	/l1/workshop/test02/dlxs/idx/w/workshopfa/
 	> /l1/workshop/test02/dlxs/prep/w/workshopfa/workshopfa.extra.dd
 /l1/workshop/test02/dlxs/bin/t/text/inc.extra.dd.pl
 	/l1/workshop/test02/dlxs/prep/w/workshopfa/workshopfa.extra.dd
 	/l1/workshop/test02/dlxs/idx/w/workshopfa/workshopfa.dd
[edit] Common common causes of error messages and solutions
- "invalid endpoints"
- If you get an "invalid endpoints" message from "make post", the most likely cause is XML processing instructions or some other corruption. The second "make validate" step should have caught these.
- "No information for region "foo"
Error found:
<Error>No information for region famname in the data dictionary.</Error>
Error found:
<Error>syntax error before: ")</Error>
- This is usually caused by the absence of a particular region that is listed in the *.extra.srch file but not present in your collection. For example if you do not have any <famname> elements in any of the EADs in your collection and you are using the out-of-the-box samplefa.extra.srch, you will see the above error message when xpat tries to index the mainauthor region using this rule:
 ((region "persname" + region "corpname" + region "famname" + region "name") within (region "origination" within
 (  region "did" within (region "archdesc")))); {exportfile "$DLXSROOT/idx/s/samplefa/mainauthor.rgn"}; export;
 ~sync "mainauthor";
The easiest solution is to modify *extra.srch to match the characteristics of your collection.
- Syntax error
Error found:
<Error>syntax error before: ")</Error>
- Sometimes xpat will claim there is a syntax error, when in fact some other error occurred just prior to where it thinks there is a syntax error. For example in the error message for the missing "famname" above, in addition to the "No information for region "famname" error, xpat also reports a syntax error. In this case once you fix the famname error, the false syntax error will go away. However, if there are no other errors reported other than syntax errors, then there is probably a real syntax error. You should always start with the first syntax error reported. In many cases there are unbalanced parenthesis. The easiest way to troubleshoot syntax errors is to start an xpatu session and cut and paste xpat queries from your *.extra.search file one at a time on the command line. (See example hereXXX).
See also Working with Fabricated Regions in Findaid Class
[edit] Testing the index
At this point it is a good idea to do some testing of the newly created index. Strategically, it is good to test this from a directory other than the one you indexed in, to ensure that relative or absolute paths are resolving appropriately. Invoke xpat with the following command
xpatu $DLXSROOT/idx/w/workshopfa/workshopfa.dd
For more information about searching, see the XPAT manual.
Try searching for some likely regions. Its a good idea to test some of the fabricated regions. Here are a few sample queries:
>> region "ead"
  1: 3 matches

>> region "eadheader"
  2: 3 matches

>> region "mainauthor"
  3: 3 matches

>> region "maintitle"
  4: 3 matches

>> region "admininfo"
  5: 3 matches
[edit] Working with Fabricated Regions in Findaid Class
[edit] Fabricated Regions Overview
When you run "make xml" , DLXS uses XPAT in combination with xmlrgn and a DTD. This process indexes the elements and attributes in the DTD as "regions," containers of content rather like fields in a database. These separate regions are built into the regions file (collid.rgn) and are identified in the data dictionary (collid.dd). This is what is happening when you are running "make xml".
However, sometimes the things you want to identify collectively aren't so handily identified as elements in the DTD. For example, the Findaid Class search interface can allow the user to search in Names regions. Perhaps for your collection you want Names to include persname, corpname, geoname. By creating an XPAT query that ORs these regions, you can have XPAT index all the regions that satisfy the OR-ed query. For example:
(region "name" + region "persname" + region "corpname" + region "geoname" +
region "famname")
Once you have a query that produces the results you want, you can add an entry to the *.extra.srch file which (when you run the "make post" command) will run the query, create a file for export, export it, and sync it:
{exportfile "$DLXSROOT/idx/c/collid/names.rgn"} export ~sync "names"
[edit] Why Fabricate Regions?
Why fabricate regions? Why not just put these queries in the map file and call them names? While you could, it's probably worth your time to build these succinctly-named and precompiled regions; query errors are more easily identified in the index building than in the CGI, and XPAT searches can be simpler and quicker for terms within the prebuilt regions.
The middleware for Findaid Class uses a number of fabricated regions in order to speed up xpat queries and simplify coding and configuration.
Findaid Class uses fabricated regions for several purposes
- To share code with Text Class (e.g. region "main")
- Fabricated regions for searching (e.g. region "names")
- Fabricated regions to produce the Table of Contents and to implement display of EAD sections as focused regions such as the "Title Page" or "Arrangement" ( See Working with the table of contents for more information on the use of fabricated regions for the table of contents.)
- Other regions specifically used in a PI (region "maintitle" is used by the PI <?ITEM_TITLE_XML?> used to display the title of a finding aid at the top of each page)
The fabricated region "main" is set to refer to <ead> in FindaidClass with:
(region ead); {exportfile "/l1/idx/b/bhlead/main.rgn"}; export; ~sync "main";
whereas in TextClass "main" can refer to <TEXT>. Therfore, both FindaidClass and TextClass can share the Perl code, in a higher level subclass, that creates searches for "main".
Other fabricated regions are used for searching such as the "maintitle" and "mainauthor" regions.
[edit] Fabricated Regions in the UI
All of the search links in the dropdown menu for the basic search (see below) are based on indexes for fabricated regions.

These are the default regions used for searching and the names used in the menu:
- archdesc
- Entire Finding Aid
- names
- Names
- places
- Places
- subjects
- Subjects
- callnum
- Call Number
- maintitle
- Collection Title
- repository
- Repository
(The relationship between the region and the name in the menu is set in the map file. See Make Collection Map )
The majority of the fabricated regions for Findaid Class are used for the creation and display of the left hand table of contents in the "outline" view. The findaidclass.cfg file contains a hash called %gSectHeadsHash which is normally loaded into FindaidClass.pm's tocheads hash in the FindaidClass::_initialize method. The elements of the hash and the corresponding fabiricated regions are used to create the table of contents and to output the XML for the corresponding section of the EAD when one of the TOC links is clicked on by a user. The fabricated regions are used so XPAT can have binary indexes ready to use for fast retrieval of these EAD sections. See Customizing Findaid Class: Working with the table of contents for more information on the use of fabricated regions for the table of contents.
[edit] Working with extra.srch
Fabricated regions within the Findaid Class can be found in the extra.srch file for the sample collection at $DLXSROOT/prep/s/samplefa/samplefa.extra.srch. As with any other elements used in the interface for a given collection, fabricated regions used in the user interface, such as the names of searches available in the dropdown menu of the search box, must also be represented in the collmgr entry and the map file for that collection.
Some of the more interesting regions extracted from the samplefa.extra.srch file are listed below.
One of these regions is the add. This used to be <ADD> in the EAD 1.0 DTD, but now, is created based on the ead2002 DTD's <descgrp> tag which contains a type attribute of add.
<descgrp type="add">
A number of issues related to varying encoding practices can be resolved by the appropriate edits to the *.extra.srch file. (Although some of them may require changes to other files as well)
- If your <unititle> element precedes your <origination> element in the top level <did>, you will have to modify the "maintitle" fabricated region query in *.extra.srch
- If you do not use a <frontmatter> element, you will have to make modifications to various files including modifying *.extra.srch to provide an appropriate "Title Page" region based on the <eadheader>
- If your encoding practices for <biohist> differ from the Bentley's, you may need to make changes in the <bioghist> fabricated region although changes to other files may be suffient. The changes might include: modifying findaidclass.cfg or creating a subclass of FindaidClass and override FindaidClass:: GetBioghistTocHead, and/or changing the appropriate XSL files.
- If you want sections of the finding aid that are not completely within a well-defined element such as <relatedmaterial>or <separatedmaterial> to show up in the table of contents, you may have to create a fabricated region using the appropriate xpat query and then modify findaidclass.cfg and make other modifications to the code.
   (region ead); {exportfile "/l1/workshop/user11/dlxs/idx/s/samplefa/main.rgn"}; export; ~sync "main";

     ##
     (((region "<c01".."</did>" + region "<c02".."</did>" + region "<c03".."</did>" + region "<c04".."</did>" + region "<c05".."</did>" + region "<c06".."</did>" + region "<c07".."</did>" + region "<c08".."</did>" + region "<c09".."</did>") not incl ("level=file" + "level=item")) incl "level="); {exportfile "/l1/workshop/user11/dlxs/idx/s/samplefa/c0xhead.rgn"}; export; ~sync "c0xhead";
        ##
     ((region "<origination".."</unittitle>") within ((region did within region archdesc) not within region dsc)); {exportfile "/l1/workshop/user11/dlxs/idx/s/samplefa/maintitle.rgn"}; export; ~sync "maintitle";
     ##

     ((region "persname" + region "corpname" + region "famname" + region "name") within (region "origination" within ( region "did" within (region "archdesc")))); {exportfile "/l1/workshop/user11/dlxs/idx/s/samplefa/mainauthor.rgn"}; export; ~sync "mainauthor";
     ##

     (region "abstract" within ((region did within region archdesc) not within region "c01")); {exportfile "/l1/workshop/user11/dlxs/idx/s/samplefa/mainabstract.rgn"}; export; ~sync "mainabstract";
        ##
        ((region unitdate incl "encodinganalog=245$f") within ((region did within region archdesc) not within region dsc)); {exportfile "/l1/workshop/user11/dlxs/idx/s/samplefa/colldate.rgn"}; export; ~sync "colldate";
     ##

     (region dsc); {exportfile "/l1/workshop/user11/dlxs/idx/s/samplefa/contentslist.rgn"}; export; ~sync "contentslist";
     ##
      ########## admininfo ########
     admininfot = (region "descgrp-T" incl (region "A-type" incl "admin")); {exportfile "/l1/workshop/user11/dlxs/idx/s/samplefa/admininfo-t.rgn"}; export; ~sync "admininfo-t";
     ##
     ## ########## add ######
     addt = (region "descgrp-T" incl (region "A-type" incl "add")); {exportfile "/l1/workshop/user11/dlxs/idx/s/samplefa/add-t.rgn"}; export; ~sync "add-t";
   ## ########## frontmatter/titlepage ########
   frontmattert = region "frontmatter-T"; {exportfile "/l1/workshop/user11/dlxs/idx/s/samplefa/frontmatter-t.rgn"}; export; ~sync "frontmatter-t";
     ##
     # frontmatter itself not needed as fabricated region since it exists
     # as a regular xml region
     ##
   ## ########## bioghist ########
     bioghist = ((region "bioghist" within region "archdesc") not within region "dsc"); {exportfile "/l1/workshop/user11/dlxs/idx/s/samplefa/bioghist.rgn"}; export; ~sync "bioghist";

   ##bioghisthead = ((region "<bioghist" .. "</head>" within region "archdesc") not within region "dsc"); {exportfile "/l1/workshop/user11/dlxs/idx/s/samplefa/bioghisthead.rgn"}; export; ~sync "bioghisthead";
     ##
   ((region did within region archdesc) not within region dsc); {exportfile "/l1/workshop/user11/dlxs/idx/s/samplefa/summaryinfo.rgn"}; export; ~sync "summaryinfo";;
     ##
   ##
   #############################
   (region "subject" + region "corpname" + region "famname" + region "name" + region "persname" + region "geogname"); {exportfile "/l1/workshop/user11/dlxs/idx/s/samplefa/subjects.rgn"}; export; ~sync "subjects";
   (region "corpname" + region "famname" + region "name" + region "persname"); {exportfile "/l1/workshop/user11/dlxs/idx/s/samplefa/names.rgn"}; export; ~sync "names";


   #(region "odd-T" ^ (region odd not within region dsc)); {exportfile "/l1/workshop/user11/dlxs/idx/s/samplefa/odd-t.rgn"}; export; ~sync "odd-t";
See samplefa.extra.srch for all of the fabricated regions used with the samplefa collection.
[edit] Fabricated regions required in Findaid Class
- main
- maintitle
- mainauthor
- mainabstract
- colltitle
- colldate
- callnum
- contentslist
- contentslist-t
- admininfo
- admininfo
- admininfo-t
- frontmatter-t
- bioghist-t
- arrangement-t
- controlaccess-t
- controlaccess
- scopecontent-t
- summaryinfo-t
- summaryinfo
[edit] Fabricated regions commonly found in Findaid Class
- subjects
- names
[edit] Customizing Findaid Class
Main Page > Mounting Collections: Class-specific Steps > Mounting a Finding Aids Collection > Customizing Findaid Class
[edit] Working with the table of contents
The table of contents on the left-hand side of the finding aid display is based on fabricated regions set up in *.extra.srch and configured either in a configuration file or in a subclass of FindaidClass.pm
If a subclass is not being used to override the FindaidClass::_initialize method, the configuration file will be used. It is:
$DLXSROOT/cgi/f/findaidclass/findaidclass.cfg
The configuration file sets up a hash called %gSectHeadsHash. The relevant section of the findaidclass.cfg file is:
# **********************************************************************
# Hash of section heads that XPAT should search for.  A reference to
# this hash is added as member data keyed by 'tocheads' to the
# FindaidClass object at initialization time. Comment out those that
# are missing in your finding aids.
# **********************************************************************
%gSectHeadsHash = (
                  'bioghist-t'      =>  {
                                         'collection' => qq{Biography},
                                         'recordgrp' => qq{History},
                                        },
                  'controlaccess-t' => qq{Subject Terms},
                  'frontmatter-t'   => qq{Title Page},
                  'arrangement-t'   => qq{Arrangement},
                  'scopecontent-t'  => qq{Collection Scope and Content Note},
                  'summaryinfo-t'   => qq{Summary Information},
                  'contentslist-t'  => qq{Contents List},
                  'admininfo-t'     => qq{Access and Use},
                  'add-t'           => qq{Additional Descriptive Data},
                 );
The %gSectHeadsHash is normally loaded read from the configuration file and loaded into a hash called tocheads in the FindaidClass::_initialize method when the FindaidClass object is created. If you wish to change the table of contents on a collection-specific basis, you can override the FindaidClass::_initialize method in a collection-specific subclass.
For an example of using a subclass to override the default table of contents see: $DLXSROOT/cgi/f/findaid/FindaidClass/SamplefaFC.pm or $DLXSROOT/cgi/f/findaid/FindaidClass/DemofaFC.pm
Note that the default setting in the Collection Manager for the samplefa collection is to use the SamplefaFC subclass:
![]()
The diagram below shows the fabricated region and the corresponding EAD element tags for the out-of-the-box table of contents

[edit] Changing the labels in the table of contents
If you want to change the labels for all of your Findaid Class collections, you can change the strings in the %gSectHeadsHash hash in $DLXSROOT/cgi/f/findaid/findaidclass.cfg. If you want to change the labels on a collection by collection basis, you will probably want to subclass and override the FindaidClass::_initialize method as is done in the sample files: $DLXSROOT/cgi/f/findaid/FindaidClass/SamplefaFC.pm and $DLXSROOT/cgi/f/findaid/FindaidClass/DemofaFC.pm
DemofaFC.pm has some examples where the old label is commented out and the new ones added (bioghist-t,summaryinfo-t,adminifo-t, add-t). Also it has the two added sections relmaterial-t and sepmaterial-t described below in
Excerpt from $DLXSROOT/cgi/f/findaid/FindaidClass/DemofaFC.pm:
  $self->SetSelfKeyInfo( 'tocheads' =>
                           {
                            # This provides a default heading if there is no <head> element in the <biogh
ist>
                            # it replaces the Bentley-specific code
                            'bioghist-t'      => qq{Biographical/Historical Note },
             #               'controlaccess-t' => qq{Subject Terms},
                            'controlaccess-t' => qq{Subjects},
                            'frontmatter-t'   => qq{Title Page},
                            'arrangement-t'   => qq{Arrangement},
                            'scopecontent-t'  => qq{Collection Scope and Content Note},
 #                           'summaryinfo-t'   => qq{Summary Information},
                           'summaryinfo-t'   => qq{Abstract},
                            'contentslist-t'  => qq{Contents List},
#                            'admininfo-t'     => qq{Access and Use},
                            'admininfo-t'     => qq{Administrative Information},
#                            'add-t'           => qq{Additional Descriptive Data},
                            'sepmaterial-t'           => qq{Separated Material},
                            'relmaterial-t'           => qq{Related Material},
                           }
                         );
In addition to changing the labels in the hash, you will probably also need to change the corresponding sections of the XSL for the "view entire text" view. To do this you should create a text.components.xsl file in your collection-specific directory $DLXSROOT/web/m/mycoll. The first statement in that file should be an import for the f/findaid/text.components.xsl (See xxx).
Copy the template for filtering the entire ead from $DLXSROOT/web/f/findaid/text.comonents.xsl
That template starts with:
<xsl:template match="ead" mode="main">
You will see a number of sections that put some text in a class="tophead":
  <xsl:if test="archdesc/controlaccess">
      <div class="tophead">
        <xsl:text>Subject Terms</xsl:text>
      </div>
      <blockquote>
        <xsl:apply-templates select="archdesc/controlaccess"/>
      </blockquote>
    </xsl:if>
These are the parts you will need to modify to match the changes you made to the TOCheads hash. See $DLXSROOT/web/d/demofa/text.components.xsl for an example
(XXX TODO: Tom: Change the xsl file to match the subclass changes!)
[edit] Adding sections to the table of contents
We will use the sections/elements Related Material and Separated Material,<relatedmaterial> and <separatedmaterial> as an example.
[edit] Step 1. Add the appropriate xpat region definitions to your extra.srch file
# Separated and related material
# separated material
(region "separatedmaterial-T" not within region "descgrp"); {exportfile "$DLXSROOT/idx/d/demofa/sepmaterial-t.rgn"}; export; ~sync "sepmaterial-t";
(region "separatedmaterial" not within region "descgrp"); {exportfile "$DLXSROOT/idx/d/demofa/sepmaterial.rgn"}; export; ~sync "sepmaterial";
#
# related material
(region "relatedmaterial-T" not within region "descgrp"); {exportfile "$DLXSROOT/idx/d/demofa/relmaterial-t.rgn"}; export; ~sync "relmaterial-t";
(region "relatedmaterial" not within region "descgrp"); {exportfile "$DLXSROOT/idx/d/demofa/relmaterial.rgn"}; export; ~sync "relmaterial";
See $DLXSROOT/prep/d/demofa/demofa.extra.srch for an example
[edit] Step 2. Modify the TOC headers hash
You can either 2A modify the $DLXSROOT/cgi/f/findaidclass/findaidclass.cfg config file if you want to change this for all your collections or 2.B.create a subclass, if this change only applies to one of your collections.
[edit] Step 2.A. Modify the $DLXSROOT/cgi/f/findaidclass/findaidclass.cfg config file.
Add the two regions and the text labels you want to the %gSectHeadsHash in $DLXSROOT/cgi/f/findaidclass/findaidclass.cfg
%gSectHeadsHash = (
                  'bioghist-t'      =>  {
                                         'collection' => qq{Biography},
                                         'recordgrp' => qq{History},
                                        },
                  'controlaccess-t' => qq{Subject Terms},
                  'frontmatter-t'   => qq{Title Page},
                  'arrangement-t'   => qq{Arrangement},
                  'scopecontent-t'  => qq{Collection Scope and Content Note},
                  'summaryinfo-t'   => qq{Summary Information},
                  'contentslist-t'  => qq{Contents List},
                  'admininfo-t'     => qq{Access and Use},
                  'add-t'           => qq{Additional Descriptive Data},
                  # add the two lines below:
                  'sepmaterial-t'           => qq{Separated Material},
                  'relmaterial-t'           => qq{Related Material},
                 );
[edit] Step 2.B. Create a subclass
(only if you don't do step 2.A.)
Step 2.B.1. Create the subclass
See Subclassing_DLXS_Class_Modules for general background. The easiest way to do this is to copy the example subclass in $DLXSROOT/cgi/f/findaid/FindaidClass/SamplefaFC.pm
Copy this file to $DLXSROOT/cgi/f/findaid/FindaidClass/MyCollNameFC.pm (You may also want to look at $DLXSROOT/cgi/f/findaid/FindaidClass/DemofaFC.pm which contains sample code that changes many of the labels in the Table of Contents in addition to adding separated and related material)
Change the package name to match the name of the module. For this example you would change package SamplefaFC to package MyCollNameFC at the very top of the file.
Add the sections you want to sub _intitialize
sub _initialize
{
   my $self = shift;
   my ( $collid, $cio, $optionalArgsHashRef ) = @_;
   $self->SUPER::_initialize( @_ );
   # Not necessary to subclass this item unless there are other outline
   # heads that are desired
   $self->SetSelfKeyInfo( 'tocheads' =>
                          {
                           'bioghist-t'      =>  {
                                                  'collection' => qq{Biography},
                                                  'recordgrp' => qq{History},
                                                 },
                           'controlaccess-t' => qq{Subject Terms},
                           'frontmatter-t'   => qq{Title Page},
                           'arrangement-t'   => qq{Arrangement},
                           'scopecontent-t'  => qq{Collection Scope and Content Note},
                           'summaryinfo-t'   => qq{Summary Information},
                           'contentslist-t'  => qq{Contents List},
                           'admininfo-t'     => qq{Access and Use},
 #                          'add-t'           => qq{Additional Descriptive Data},
 # here are the two lines to be added
                           'sepmaterial-t'           => qq{Separated Material},
                           'relmaterial-t'           => qq{Related Material},
                          }
                        );
}
Step 2.B.2. Edit the Collmgr entry to point to the new subclass instead of SamplefaFC:
![]()
[edit] Step 3. Add appropriate XSL to render the sections
See also User_Interface_Customization#XSL_Stylesheet for more information on this step.
Create a web directory for your collection and two empty files called text.components.xsl and text.xsl
 mkdir $DLXSROOT/web/m/mycoll
 cd $DLXSROOT/web/m/mycoll
 echo "" >text.components.xsl
 echo "" >text.xsl
Add the basic xsl template and add an import statement to import the class level xsl file. Example for $DLXSROOT/web/m/mycoll/text.components.xsl:
  <?xml version="1.0" encoding="utf-8"?>
  <xsl:stylesheet xmlns:xsl="http://www.w3.org/1999/XSL/Transform"
                version="1.0">

  <!-- import/include (should be first child of stylesheet element -->
  <!-- DLXS convention: for import, path is always relative to DLXSROOT/web -->
  <xsl:import href="../../f/findaid/text.components.xsl"/>


   </xsl:stylesheet>
For $DLXSROOT/web/m/mycoll/text.xsl, use the same text as above, except change the name of the imported file from "f/findaid/text.components.xsl" to "f/findaid/text.xsl"
For text.xsl you need to copy the template for <xsl:template match="RegionContent"> from f/findaid/text.xsl.
Add sections for relmaterial and sepmaterial (Note that if you named your region searches differently in your extra.srch you will have to change the lines to match accordingly.)
      <xsl:template match="RegionContent">
        <xsl:choose>
          <!-- This is a copy of the template by the same name in
               $DLXSROOT/webf/findaid/text.xsl
               We are just adding a few lines for two new sections
               -->

          <xsl:when test="$FocusRegion = 'relmaterial'">
            <xsl:apply-templates select="relatedmaterial"/>
          </xsl:when>

          <xsl:when test="$FocusRegion = 'sepmaterial'">
            <xsl:apply-templates select="separatedmaterial"/>
          </xsl:when>

          <xsl:when test="$FocusRegion = 'summaryinfo'">
            <xsl:apply-templates select="." mode="summaryinfo"/>
          </xsl:when>
          ....
     </xsl:template>
For text.components.xsl, there are two steps.
1) Create templates for the sections (in this case <relatedmaterial> and <separatedmaterial> ).
Here we have added some text "Debugging: XXX" and a simple "xsl:apply-templates". You may need to make more changes, but this is a good start. (Alternatively, you can use <xsl:copy-of select="."> instead of apply-templates for debugging purposes and that should echo the raw xml to your html page.)
2) Copy the entire main ead processing template from $DLXSROOT/web/f/findaid/text.components.xsl
3) Add appropriate templates for your new TOC sections to the main ead processing template.
  <?xml version="1.0" encoding="utf-8"?>
  <xsl:stylesheet xmlns:xsl="http://www.w3.org/1999/XSL/Transform"
                version="1.0">

  <xsl:import href="../../f/findaid/text.components.xsl"/>

  <xsl:template match="relatedmaterial">
    <xsl:text>Debugging: Related Material </xsl:text>
    <xsl:apply-templates/>
  </xsl:template>

  <xsl:template match="separatedmaterial">
    <xsl:text>Debugging: Separated Material </xsl:text>
      <xsl:apply-templates/>
  </xsl:template>

<!-- main ead processing template goes here-->


 </xsl:stylesheet>
[edit] Changing the Bioghist labels to use the appropriate <head> elements
There are actually four places in the DLXS code where changes have to be made:
- FindaidClass::_initialize sets the label for bioghist in tocheads hash
- FindaidClass::GetBioghistTocHead chooses a label according to the <archdesc label="">
- text.components.xsl has a general section for displaying a region that needs to not display the first <head> in <bioghist> since the label will already be inserted by FindaidClass::GetBioghistTocHead
- text.components.xsl has a section for processing the entire ead ("view entire ead") that outputs labels for each section.
The easiest way to do this is to copy the sample files. Assuming your collecton is m/mycoll, here are the steps:
- Create a subclass of FindaidClass and override FindaidClass::_initialize and FindaidClass::GetBioghistTocHead
- Copy $DLXSROOT/cgi/f/findaid/FindaidClass/BioghistfaFC.pm to $DLXSROOT/cgi/f/findaid/FindaidClass/MyCollfaFC.pm
- Change the package name at the top of the file from BioghistfaFC to MyCollfaFC
- edit the default biohist label in the tocheads array to match the default you want to be used when there is no <head> section.
- (You may also want to change labels for other sections of the table of contents in the tocheads array.)
- Edit the Collmgr entry to point to the new subclass (MycollfaFC instead of SamplefaFC:
![]()
- Create a collection specific copy of text.components.xsl and override the appropriate sections as outlined below
- Copy $DLXSROOT/web/b/bioghistfa/text.components.xsl to $DLXSROOT/web/m/mycoll/text.components.xsl
- Edit the bioghist section of the "match entire ead" template : <xsl:template match="ead" mode="main"> just below the comment that says "default when there is no head should go here..." to match whatever you put for the default for the bioghist label in the tocheads hash.
 <xsl:if test="archdesc/bioghist">
      <xsl:choose>
        <xsl:when test="archdesc/bioghist/head">
          <div class="tophead">
          <xsl:value-of select="archdesc/bioghist/head"/>
        </div>
        </xsl:when>
        <xsl:otherwise>
          <div class="tophead">
            <!-- default when there is no head should go here This should be the same as whats in the TOCheads hash-->
            Biographical/Historical Note
          </div>
        </xsl:otherwise>
      </xsl:choose>
      <blockquote>
        <xsl:apply-templates select="archdesc/bioghist"/>
      </blockquote>
      <br/>
    </xsl:if>
[edit] Mounting the Collection Online
Main Page > Mounting Collections: Class-specific Steps > Mounting a Finding Aids Collection > Mounting the Collection Online
These are the final steps in deploying an Findaid Class collection online. Here the Collection Manager will be used to create and edit a Collection Database entry for workshopfa . The Collection Manager will also be used to check the Group Database. Finally, we need to work with the collection map and the set up the collection's web directory.
[edit] Create and edit an entry in the Collection Database for your collection with CollMgr
Each collection has a record in the collection database that holds collection specific configurations for the middleware. CollMgr (Collection Manager) is a web based interface to the collection database that provides functionality for editing each collection's record. Collections can be checked-out for editing, checked-in for testing, and released to production. In general, a new collection needs to have a CollMgr record created from scratch before the middleware can be used.
Step 1. Create a workshopfa Collmgr entry by copying from samplefa.
A. Login to Collmgr. The URL should be:
http://path_to_cgi/cgi/c/collmgr/collmgr
The collmgr page is usually set up to use apache basic authorization. The username and password should have been set up when you set up your virtual host in apache. (sample apache virtual host )
B. Select Manage Collections:Findaid Class:


C. Select samplefa and click on "copy a collection" (Note: In the image below workshopfa already exists, but in your clean install it will not exist)

D. Enter your collection id (workshopfa)

E. Change all occurances of "samplefa" to "workshopfa" For example in the section below the webdir should be changed from "s/samplefa" to "w/workshopfa" (And you need to copy and rename the appropriate files from $DLXSROOT/web/s/samplefa to $DLXSROOT/web/w/workshopfa)
WARNING! If you forget to change one of the entries it can lead to very confusing results. For example if you forget to change the "dd" file entry from "/idx/s/samplefa/samplefa.dd" to /idx/w/workshopfa/workshopfa.dd", the middleware will try to search the samplefa collection but all the rest of the configuration information will point to workshopfa, which will result in erratic behavior and potentially confusing error messages.
F. Change the entry for the subclassmodule from "/FindaidClass/SamplefaFC" to "FindaidClass". This means that this collection will use the default FindaidClass.pm instead of the SampleFC subclass. (Unless you want to subclass Findaid Class in which case you would replace "SamplefaFC with the name of your collection-specific subclass)

G. Set the containerdepth field to the depth of containers in your collection
![]()
For example if you have levels c01 to c05 set the containerdepth to 5. You can use the xpat command {ddinfo regionnames} to look at your data and look for the highest c level to determine what number to put here.
xpatu $DLXSROOT/idx/s/samplefa/samplefa.dd
?>> {ddinfo regionnames}
If you have containerdepth set to a number that is higher than what is in your data, xpat will try to search for the missing c0x level elements and will produce errors. This can occur whenever xpat tries to query the 'c0xheads" fabricated region. For example we set the continer depth to 7 for the samplefa collection (the samplefa collection only has c01-c06) and then got the following error message when we tried to view a kwic (search terms in context) view for the Post Family Papers in our web browser:
Message: Query error in samplefa, samplefa.dd, query=pr.region.c0xhead
(region "c0xhead" ^ ( region "c07" incl *detailslicesearch ));,
Error=No information for region c07 in the data dictionary. syntax error before: ))
You will also probably want to edit:
- fields related to the dynamic browse page (See Create a browse page)
- fields related to searching and sorting in the user interface: regionsearch, termsearch, sortfields (Note that these need to match the entries in your map file
More Documentation
[edit] Review the Groups Database Entry with CollMgr
Another function of CollMgr allows the grouping of collections for cross-collection searching. Any number of collection groups may be created for Findaid Class. Findaid Class supports a group with the groupid "all". It is not a requirement that all collections be in this group, though that's the basic idea. Groups are created and modified using CollMgr.
[edit] Make Collection Map
Collection mapper files exist to identify the regions and operators used by the middleware when interacting with the search forms. Each collection will need one, but most collections can use a fairly standard map file, such as the one in the samplefa collection. The map files for all Findaid Class collections are stored in $DLXSROOT/misc/f/findaid/maps
You can find an example map file for the sample finding aids collection at DLXSROOT/misc/f/findaid/maps/samplefa.map. Rather than modifying this file, you should copy it so that you always have a blank copy to which to refer.
You can use the following commands to copy the samplefa.map file to use as a basis for your collection:
 cd $DLXSROOT/misc/f/findaid/maps
 cp samplefa.map workshopfa.map
Map files contain mapped items where one term or name for the item is mapped to another term or name. For example, a term used by an HTML form to refer to a searchable region (e.g., "entire finding aid") can be mapped to an XPAT searchable region (e.g., EAD). For more general background on map files, see Working with Map Files
Currently, the format of the map files is XML and each collection map file conforms to a simple DTD (we have considered implementation of other possible ways of mapping terms, such as a database where one could map from one column's data to another). The middleware reads the map file into a TerminologyMapper object after which the CGI program can at any time request of the object the mappings for terms. Each mapped item and its various terms are contained within a <MAPPING> element.
Each mapping element in a map file consists of the following:
- label
- This element determines what will display in the user's browser when constructing searches. It must match the value used in the collmgr. (See step 2.)
- synthetic
- This element contains the variable name as it is used in the cgi.
- native
- The "native" element provides an appropriate XPAT search that the system will use to discover the appropriate content. The search may be simple (e.g., region EADID) or complex (e.g., ((region DID within region ARCHDESC) not within region DSC))
- nativeregionname
- The element name itself, as it is indexed, without terms used in the XPAT search.
Map files take language that is used in the forms and translates it into language for the cgi and for XPAT. For example, if you want your users to be able to search within names, you need to add a mapping for how you want headings and categories to appear in the search interface (case is important, as is pluralization!), how the cgi variable is set (usually in all caps, and not stepping on an existing variable), and how XPAT will identify and retrieve this natively (in XPAT search language). The first part of the map file is operator mapping, for the form, the cgi, and XPAT, and the second part is for region mapping. You might note that some of the fields that are defined in the map file correspond to some of the fabricated regions. Note: The larger the map file, the slower your site will run, so you don’t necessarily want to map everything, such as variations of singular and plural fields.
[edit] More Documentation
[edit] Set Up the Collection's Web Directory
You don't necessarily need to set up a web directory for your collection. You can try out your collection at the URL: http://$DLXSROOT/cgi/f/findaid/findaid-idx?c=workshopfa .
However, if you want to do collection-specific customization you may want to create a collection-specific web directory. Also if you want to create a static browse page or main page you may also want to set up a collection-specific web directory.
Each collection may have a web directory with custom Cascading Style Sheets, interface templates, graphics, and javascript. The default is for a collection to use the web templates at $DLXSROOT/web/f/findaid. Of course, collection specific templates and other files can be placed in a collection specific web directory, and it is necessary if you have any customization at all. DLXS Middleware uses [../ui/index.html#fallback fallback] to find HTML related templates, chunks, graphics, js and css files.
For a minimal collection, you will want two files: index.html and FindaidClass-specific.css.
mkdir -p $DLXSROOT/web/w/workshopfa
cp $DLXSROOT/web/s/samplefa/index.html $DLXSROOT/web/w/workshopfa/index.html
cp $DLXSROOT/web/s/samplefa/findaidclass-specific.css $DLXSROOT/web/w/workshopfa/findaidclass-specific.css
You might want to change the look radically, if your HTML skills are up to it.
Note that the browse link on the index.html page is hard-coded to go to the samplefa hard-coded browse.html page. You may want to change this to point to a dynamic browse page (see below). The url for the dynamic browse page is ".../cgi/f/findaid/findaid-idx?c=workshopfa;page=browse".
If you want to use a hard-coded browse page, you could copy the $DLXSROOT/web/s/samplefa/browse.html page to $DLXSROOT/web/w/workshopfa/browse.html and edit the link in $DLXSROOT/web/w/workshopfa/index.html accordingly.
If you would prefer a dynamic home page, instead of the static index.html, you can copy and modify the home.xml and home.xsl files from $DLXSROOT/web/f/findaid/. Note that they are currently set up to be the home page for all finding aids collections, so you will have to do some considerable editing. However they contain a number of PIs that you may find useful. In order to have these pages actually be used by DLXS, they have to be present in your $DLXSROOT/web/w/workshopfa/ directory and there can't be an index.html page in that directory. The easiest thing to do, if you have an existing index.html page is to rename it to "index.html.foobar" or something.
[edit] Create a browse page
See the documentation: Setting up Dynamic Browsing
[edit] Try It Out
http://$DLXSROOT/cgi/f/findaid/findaid-idx?c=workshopfa
[edit] Troubleshooting Finding Aids
[edit] General Techniques
[edit] Debugging XSLT with Oxygen
Run the page in question with the ;debug=xsltwrite flag.
http://dev.umdl.umich.edu/cgi/f/findaid/findaid-idx?c=samplefa;idno=umich-bhl-851435
Add ";debug=xsltwrite" (without the quotes to the end of the url)
http://dev.umdl.umich.edu/cgi/f/findaid/findaid-idx?c=samplefa;idno=umich-bhl-851435;debug=xsltwrite
You should see a message telling you where the xsl and xml files were written:
wrote files: $DLXSROOT/web/cache/tburtonw.temp.xsl, $DLXSROOT/web/cache/tburtonw.temp.xml
You can verify that these files work by using xsltproc
xsltproc $DLXSROOT/web/cache/tburtonw.temp.xsl $DLXSROOT/web/cache/tburtonw.temp.xml |less
We have found that running Oxygen on the server is can be too slow to be very usable, so we generally run it on our desktops. However, if your server is fast enough running it on the server is easier. Following are instructions for running it on the server and then for running it on the desktop.
Running Oxygen on the server.
Change to the cache directory and invoke oxygen (assuming its on your $PATH)
$DLXSROOT/web/cache/
oxygen &
Open both files in Oxygen
Run the oxygen xml formatter on both files. (This makes it easier to debug)
Edit the xml file:
Replace bookbagitemsstring.xsl with bookbagitemsstring_debug.xsl
Run the transform
Switch to the debugger
Run
Instructions for running on your workstation.
Running on the workstation can be much faster than on the server(depending on your server and workstation) The downside of running on the workstation is that you have to copy all the required xsl files to your desktop. The upside is that it runs pretty fast.
Create a root directory on your desktop. In the example we will call it c:\debugging Create these subdirectories c:\debugging\f\findaid c:\debugging\lib c:\debugging\m\mycoll (where mycoll is your collection name)
Download using scp or sftp the following files from the server to your desktop
- the *temp.xsl and *temp.xml to c:\debugging
- all the xsl files in $DLXSROOT/web/f/findaid to c:\debugging\f\findaid
- all the xsl files in $DLXSROOT/web/lib to c:\debugging\lib
- any xsl files in your $DLXSROOT/web/m/mycoll to c:\debugging\m\mycoll
Open the xsl file in Oxygen
Edit the import statements in Oxygen using the Find|Find Replace from the menu replace $DLXSROOT/web/ with nothing:
"/l/web/f/findaid/text.xsl" would become "f/findaid/text.xsl"
Change "bookbagitemsstring.xsl" to "bookbagitemssring_debug.xsl"
run
[edit] Common Problems and Solutions
[edit] Title of Finding Aid does not show up
This is usually caused by the <origination> preceding the <unittitle> in the top level <did> element of your EAD as in the example below.
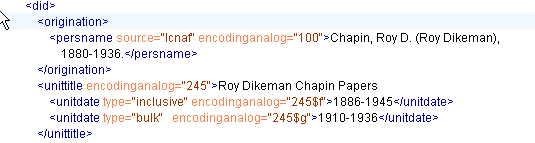

In the Bentley EADs the <unittitle> comes before the <origination> as in the example below.
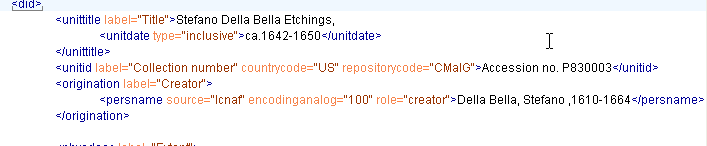

As you can see in the *.extra.srch file, the xpat query is starting at the first opening <unittitle> tag and ending at the closing </origination> tag. If this doesn't match your encoding practices you can comment out the following line:
(note that the region definitions are all on one line, but have been wrapped so they will be readable in the wiki)
##
((region "<origination".."</unittitle>")
within ((region did within region archdesc)
not within region dsc));
{exportfile "/l1/release/13/idx/s/samplefa/maintitle.rgn"};
 export; ~sync "maintitle";
##
and copy the line but reverse the order of unittitle and origination
##
((region "<unittitle".."</origination>")
within ((region did within region archdesc)
not within region dsc));
{exportfile "/l1/release/13/idx/s/samplefa/maintitle.rgn"};
export; ~sync "maintitle";
##
[edit] make post errors
Error found:
No information for region famname in the data dictionary.
- need example misnamed rgn file from extra.srch renaming problem
See also
[edit] Linking from Finding Aids
[edit] Workshop Materials
[edit] Working with the User Interface
General user interface customizations, such as changing rendering style (CSS) or making changes to the XSL are covered in Customizing the User Interface. Specific user-interface issues related to Findaid Class are discussed in the following sections:
- Customizing Findaid Class
- Working with Fabricated Regions in Findaid Class
- Common Problems and Solutions
[edit] Findaid Class Graphics Files
Are there findaid class specific graphics files? The existing html docs actually point to a ../t/text/ directory and it appears that the graphics are generic and not at all specific to findaid class.
[edit] Findaid Class Processing Instructions
These are some current processing instructions for Finding Aids Class, but the DLXS group will not maintain this section.
